Florafelt Pocket Panels - Recirculating Installation
Guides: About | Design Ideas | Install Guide | Drip Irrigation Guide
Mounting: Hang On Hooks | Wood Framed | Recirculating | Custom Sizing | Mounting Methods | Mount On Stucco
Specs: Spec Sheets | Architectural Specifications
Easy and Efficient Design
When you do not have access to a drain you’ll need to create a living wall installation that uses tanks to store water. A system of tubes, pumps and timers will bring water to the top of the wall to irrigate the plants. Water wicks down and back into the tanks.
This efficient system recycles water and is fairly easy to install if you have some experience with basic carpentry skills.
What You’ll Need
MATERIALS
16 Florafelt 12-Pocket Panels
2 Recirc Irrigation Kits including 1 pump each
2 Water tanks with access slots cut out at the top
2 Sheets EPDM Pond Liner
LUMBER
6 2x4s
3 Edge Frames
3×3 Metal Angle
2 sheets of 1/2 inch plywood
HARDWARE
Box of 3 inch screws
Box of 1-5/8 inch smooth coated deck screws
Box of Finish Nails
Bag of Zip Ties
Roll of Gorilla Tape
3 Prong Digital Timer
Blue Painters Tape
TOOLS
Screw Driver with Phillips Bit
Hand Saw with Miter Box
Staple Gun with 1/2 inch staples
Level
Pencil

Wall Markup
Locate a good place for your living wall.
Use a pencil to mark your wall at 10’ 8” width and 9’ 11” height.
Make a mark 5” above the floor for an air gap at the base.
TIPS
Make your marks using blue painters tape in case you change your mind.
Make all marks level and square.

Support Framing
Locate wall framing studs inside the wall.
Attach 6 2x4s on the wall evenly spaced between the top and bottom marks.
Space evenly.
Use deck screws long enough to securely attach to the wall framing inside the wall.
Make sure all boards are mounted level.

Edge Trim
Add edge trim to the outside faces of your wall supports.
Use 1×6 finish trim to suit your deign style.
Use finish nails for a professional look.
Pre-paint your edge trims before mounting to make finishing easier.

Plywood Support
Use 1/2 plywood as a mounting surface.
Cut and attach to fill in the areas between the trim.
Use screws or nails to attach the plywood to the support framing.
Be sure to leave a gap at the base to prevent accidental moisture wicking into the wall.

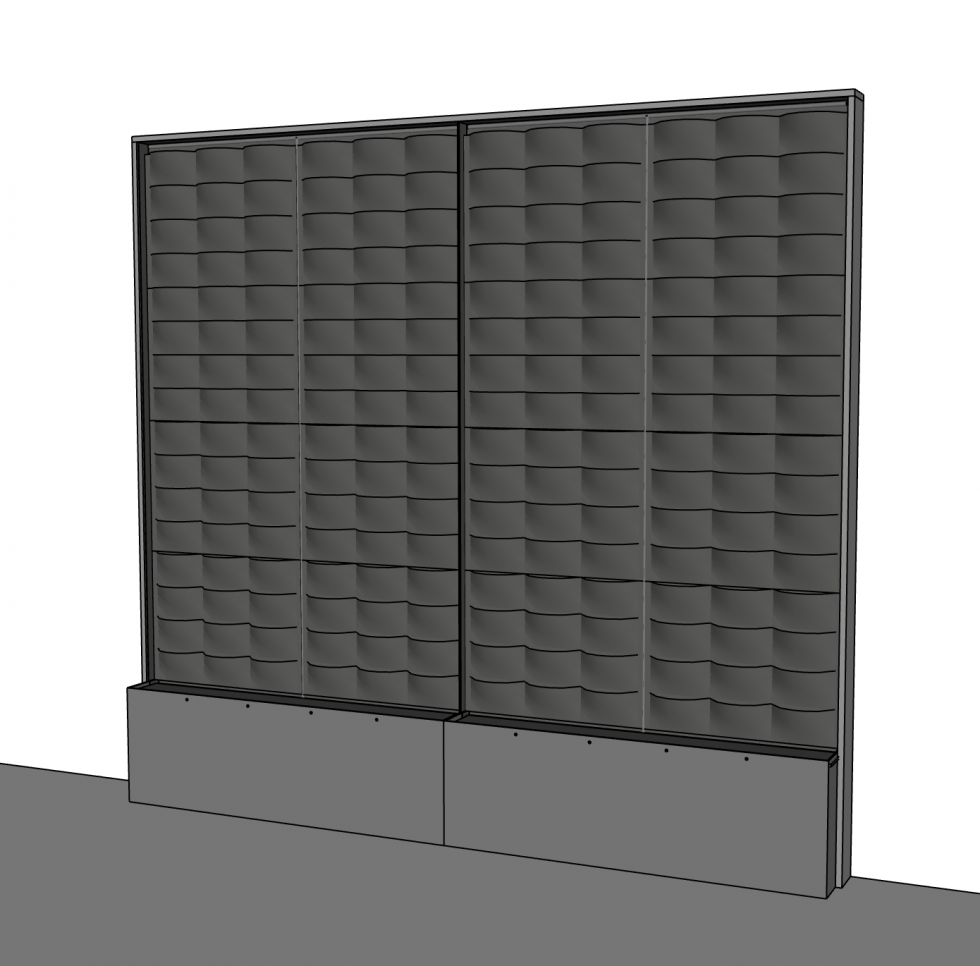
Water Tanks
Place water tanks at the base.
They should fit snugly into place.
The tanks should not be attached so they can be removed or replaced if needed.

Water Tank Details
Water Tanks are made from a heavy duty PET plastic that is rotomolded into an extremely dense and watertight container.
Each tank should be 64” W x 21” H x 9 1/4” D.
Internal supports keep the tank from bulging out when full with water.
Internal supports are made from 1/4″ PEX tubing that are screwed into place.
Rubber washers are used internally at each support to maintain a watertight seal.
The supports also provide support for the lid.

Metal Divider
Add a 3″x3” metal angle at the center of the wall, between the tanks to separate the water systems.
Attach with screws
ALWAYS KEEP YOUR RECIRCULATING SYSTEMS COMPLETELY SEPARATED – Note this is a very important detail since water will wick between the felt pockets and water will accumulate into a single tank and can cause water to overflow.

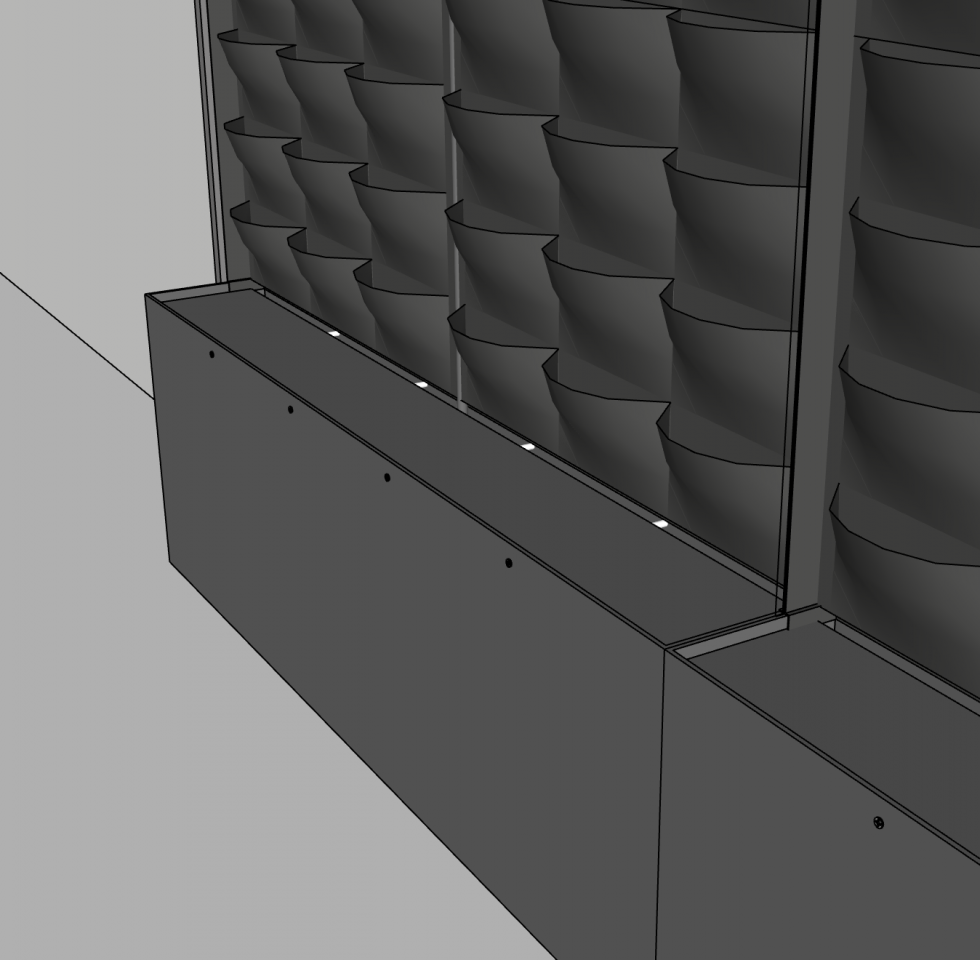
Waterproofing
Add EPDM rubber waterproofing.
Do not substitute with other pond liners as they will not self-seal when attachments penetrate the liner. EDPM is available on our site.
Cut the liner 6 inches wider and 9 inches taller than each area of the planting areas.
position the waterproofing at so there is 3 inches folded into the top and sides.
Use a staple gun to lightly tack the waterproofing in place.
Tuck the additional 6 inches of waterproofing into the tank slot below.
Use Gorilla Tape at the edges to neatly secure the upper edges in place.
Do not attach the flaps that enter the tank. This will allow for the tanks to be easily removed if required.

Florafelt Pockets
Mount Florafelt Pocket Panels in place being sure they are level.
Start at the bottom and work your way up.
Use 1-5/8 inch smooth coated deck screws to attach to the plywood backing.
Use 4 screws per panel near the corners. Pre start the screws to make it easier.
Penetrations will be sealed by the EPDM rubber waterproofing rubber.
Hold the felt firmly in place to prevent binding.
Be sure to leave a 2 inch gap at the top.
Stretch open the pockets using the handle of a hammer in the pocket to get leverage.
Tuck in the Flaps. (see Installation Guide)

Irrigation System
Add the Florafelt Recirculating kits.
Attach the tubing Tee to the top panel using zip ties that are fed thought the gap below the top pocket corner attachment points.
Make sure the holes are facing downward and into the sides of each pocket.
Place the pump on the floor in front the unit and cut the tube to fit inside the top connector. Be sure to allow for the pump to set perfect on the tank floor.
With the pump connected to the tube, lower the pump into the tank.
Run the wires to the side where you will be making electrical connections.
Attach the center tubing using zip ties at the central pocket attachments, top corner of the pocket.
Add Lids
Place lids into the tanks so they rest on the plastic tank supports.

Test the System
Fill the tanks with water.
Keep water below the plastic supports.
Plug in the pumps one at a time.
Observe the water flow to be sure water remains in the system.
Let them run for 30 minutes to make sure the water flows properly and does not drip out.
You are now ready to plant the system.